Back in May, I decided one random day at 2 am to crochet flower pot coasters for Mother’s Day (celebrated on the first Sunday of May here in Portugal). I found it while casually browsing Pinterest and decided it was the right gift. I didn’t even know if I had any yarn I could use. But I was determined to make them myself. And this late-night decision marks the beginning of my crochet adventure.
Ever since doing those coasters, I’ve learned a lot, made many mistakes and became slightly obsessed with crochet. After 2 months, I’ve been crocheting almost every day, and now that I took a little break to avoid burning myself out, I can’t stop thinking about it. I guess this means I’m a crocheter now. In this post, I’ll share everything I’ve done for the past couple of months, what I’ve learned, and even share patterns and YouTube videos I’ve been following. But before all that, I must tell you more about my history with crochet.
My first introduction to crochet
Despite only starting to crochet in May, this isn’t my first introduction to the craft. Like many Portuguese grandmothers, mine used to crochet a lot. She was the one that taught me how to hold the yarn, the hook, and do a basic chain stitch. I remember her always carrying around a little bag with her current project. She mostly did doilies and lace decorations on the border of tea towels. She wouldn’t gift a single tea towel without first crocheting on it.
This meant my vision of what you could do with crochet was limited by what I saw my grandmother do. And it wasn’t very appealing to me. Doilies have a kind of old look to them, like granny squares (which she did too), and it never interested me to make one because I didn’t find them pretty or cute. That didn’t stop me from asking her to teach me how to do it and how it worked, although I never made anything with that knowledge. But it did make me comfortable holding the yarn and the hook.
The start of my crochet adventure
Fast forward many years, and I’m rediscovering crochet. Some projects can be actually very cute, and a simple flower coaster, which isn’t very far off from a doily, can be beautiful. The pattern I found on Pinterest was the flower pot coasters from Brunaticality, which she has a YouTube video teaching how to do it. And here is where I started to encounter my first few lessons. I actually had yarn in the right colours to make this pattern. The problem was in the weight of the yarn. One tricky thing about crochet is that while it’s made all over the world, yarn weights aren’t universal. She uses a weight 2 yarn (or fine yarn) to make the coasters, although I can’t find anywhere in Portugal yarn described in that way. Here, we go by the size of the recommended hook for crocheting or for knitting. So then I had to look at what hook size she was using and realised I only had a number 6 lace yarn which was much smaller (weight 0).


Doing the project with a smaller yarn and hook isn’t a problem. I could still follow her tutorial just fine, although it does have an impact on the size of the final product. And for my sorrow, I realised it was too small to work well as a coaster. So I had to adapt. Not only was that a problem, but my coasters weren’t staying flat. They were more like a crisp or a chip than a flat circle. I dived online in the hopes I could find the help I needed. And I did! I found a blog post that explained how to crochet a circle and how to fix it when it doesn’t stay flat. It helped me a lot to understand what I was doing and how I had to tweak Bruna’s pattern to fit my yarn weight. They didn’t turn out perfect, but I was becoming a pro at doing circles.
I’m not going to lie that it was nerve wreaking when I bumped into problems I didn’t know how to fix. There wasn’t anyone next to me to guide me and say exactly where I did it wrong. Despite some troubleshooting, I was enjoying making these coasters. When I finished them, I wanted to keep going. A friend’s birthday was coming up, and since she is a big succulent lover and Bruna also has another video doing succulent coasters, I didn’t think twice. But this time, I had to buy new yarn and one that was the same weight or as close to it as I could.
Sadly, I still had to make some adjustments. Although this time around, I was more familiar with the process, so it wasn’t as challenging as the first ones. Until I reached the hedge. There are a lot of different crochet stitches, and sometimes it requires a bit of maths to make everything work. My coasters had one or two rounds more than the pattern I was following, which meant the final number of stitches wasn’t correct to have a shell stitch pattern all around. So I had to reverse-engineer it. See how many petals to make, how many stitches they would need, and deconstruct the rounds of the circle until I reached the first one.
When doing circles, a lot of the technique comes from how you start. The way you increase round after round is the same even when working with a first round with more or fewer stitches. Therefore, it’s something you can get easily used to and understand how it works. It wasn’t as hard to make these succulent coasters as it was with the first ones. I also didn’t make as many mistakes. And I was still enjoying crocheting a lot.
The discovery of the amigurumi
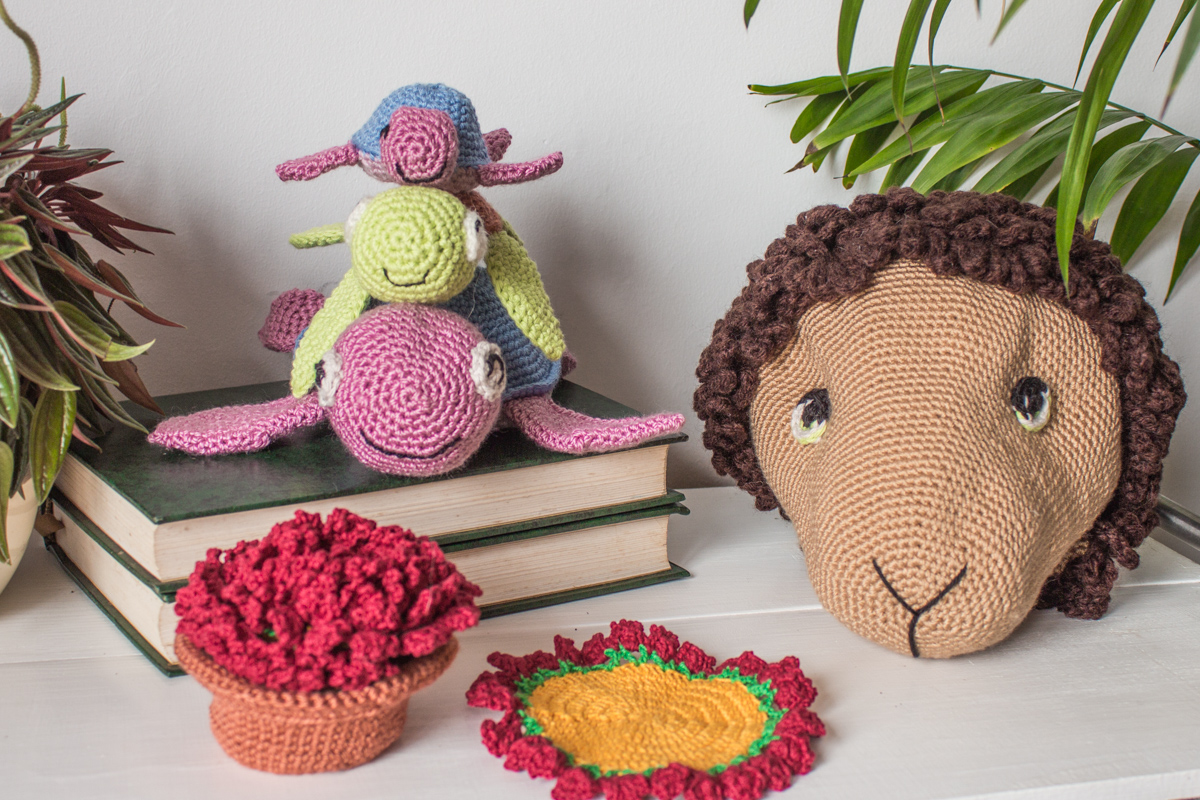
Nowadays, crochet is a synonym for amigurumi, the Japanese art of crocheting stuffed animals. And Japan only has two modes, either terrifying or extremely cute. And amigurumi are cute as a button. So it’s very easy to fall in love. Since I loved to crochet, it was only natural to progress to amigurumi. My first one was a sea turtle. My mother saw a cute turtle keychain and asked if I could make it. I searched far and wide to find a pattern. I already knew how important it was to use the right hook and yarn weight, so I had to find a pattern made for the size I wanted. And this was the hardest part. There are so many cute turtle patterns out there, but they were all too big for what I wanted to do. Until I found one. A single photo on Pinterest with the stitches and nothing more (later I found where it was taken from). I was not prepared to do a project without any assembly instructions. Doing the individual pieces was fine. They were circles in different sizes, but stitching those pieces together was a nightmare. Once it was over, I determined to follow another pattern with full instructions.


After a few more searches on Pinterest, I came across my saviour. The blog post was a little outdated and didn’t have any images of the actual turtle, but I still decided to try it out (the link wasn’t working anymore, but I found the same exact pattern in another blog). I quickly realised that it was too big to be a keychain, but I still did the project all the way through. At the same time, my YouTube algorithm was throwing me a bunch of crochet videos. And one creator stood out: ComplicatedKnots. She’s an Australian crocheter that does only amigurumi. And watching her videos taught me a lot about how amigurumi are constructed and the thought process behind them. She even has two videos explaining how to size up a pattern and size down. At that moment, I knew what I had to do. I had to try and size down the turtle pattern.
It was something I had to take my time, think carefully and also adjust as I went. I’m glad to say that it worked. I still made a mistake here and there, but otherwise, it’s a turtle. A very cute turtle. And it’s even smaller than the first one I made which is an even better size for a keychain.
The crochet pattern I’m currently doing
In one of ComplicatedKnots’ videos, a giant fluffy llama caught my eye. And after some intensive search online I found it. The Llama-no-drama. A free pattern created by Yarnspirations, and they even have videos with step-by-step instructions. So obviously, I had to do it. This is by far the most challenging project I’ve taken so far. In the end, I’ll have a stuffed llama 37 cm by 28 cm. The big turtle I did is half the size of the llama head! I went from crocheting palm-size amigurumi to a huggable size stuffed animal. And I’m not even going to think how long it will take me.
Doing the turtles, even the smallest ones, took a few hours. It wasn’t something I did in an afternoon. I’m still a beginner, and my hands don’t work as fast as I want to. I still make mistakes. I still forget to count. And more than anything, this llama is going to test my patience. This project is a marathon, not a sprint. So I’m taking things slow. Do one or maybe two rounds each day, or even skip a day or two. Now that I’ve finally finished the head, I took a little break. But that didn’t last long since I’m already back to work on it.
Even though this is the pattern I’ve followed with the most detailed instructions, I still had to make a few changes. For such a big project, it needs a lot of yarn. Luckily, I had an old bag with 14 or so yarn balls. All in a very dark brown. I can’t stress enough how dark this brown is. And so it was perfect for doing all the fur work. Although using the same yarn for the entire pattern, I was worried it would turn out too dark and the features would be lost. So I bought a lighter brown that I’m in love with, but it’s not the same weight. We’ve already seen this before. Adding rounds, taking away rounds, I can do it again. But this time, I also needed to merge two colours with different yarn weights.

For the changes to work, I had to learn what gauge was. It’s usually a squared swatch to tell which dimensions the final project will have with a set yarn weight and needle size. Change one or the other, and the gauge will change. Even just doing the stitches tighter or looser will change the gauge. So before starting, I did two rounded swatches for each colour. And the light brown yarn with a 3 mm hook had a gauge about half the size of the gauge of the darker brown with a 4 mm hook. So technically, I just had to double the rounds of the lighter colour, and I should be fine. And after 65 rounds, I have a finished head and the proof it’s possible to combine two different yarn weights, and, more importantly, I can do it.
It can be frustrating when I can’t simply follow a pattern, but all these stones in my path have taught me so much about crochet that I probably wouldn’t learn by following everything by the book. At least, I wouldn’t learn them straight away. It blows my mind how much I’ve learned in just two months. And I can only imagine how much more I’ll learn while I continue to crochet. This has been a wonderful adventure I want to continue, and a few months from now, do another post showing more of my progress. And one day, maybe stand in my grandmother’s shoes and teach my grandchildren how amazingly versatile crochet can be. I’m a crafter through and through, so crochet was destined to be something I would like. It just took me a few years to find the motivation to start.