For the past few months, I’ve been decorating boxes for my friend to give them for their birthdays. Instead of wrapping tiny presents one by one, it’s better to put them all in one box and give it away. Although, just because you are giving a box it doesn’t mean it has to be bland and boring. With a bit of imagination – and a few minutes on Pinterest – it’s possible to create something with attitude and, if you are like me, loads of humour.
The first one I did was a simple and modern box. The bottom was all black and the lid in gold paper. I enjoyed it so much I want to make one for myself. Then it came another birthday and another box, although this time, I had a theme to go with: sheep. My friend loves sheep, and it sort of became an inside joke among the group. The base of the box was in light blue and the lid in silver paper. I also printed and cut out various types of sheep and spread them all around. Then I add dialogue balloons comic-book-style to make it funnier. And when someone else has a birthday, and another box is needed to give away, I’ll be here to make more.

That is how I got inspired to do this box renovation for myself. As you can see, the box I use to store all my nail polish and nail care supplies look like it was decorated by a 4-year-old. Unfortunately, I was the one that created this monstrosity. I was trying to use the decoupage technic and got bored very quickly to create the rest of the background. So many years later, I decided it was time to fix this box and make it more pleasant to the eye.
Supplies:
Old shoe box (29x14x11cm)
White paper sheet (A1 size)
Acrylic paint
Paint Brush
Coloured paper (beige, pink, yellow, gold, black)
Glue
Hot glue gun


Step 1: I started by ripping out any paper that was already starting to peel off to make the surface smoother. Then glued the base of the box to the centre of a big sheet of paper, making sure you left enough paper on each side to fold over.


Step 2: Now is time to start marking and cutting out any pieces of paper you don’t need to wrap the entire box. I already have a tutorial for this part that I did for Christmas (link here) although contrarily of what I did in the past I recommend glueing the base first to get a perfect fit.
Mark each side of the box making sure the paper is stretched. Then do four diagonal lines from each corner of the box to the edge of the sheet. Extend the first lines until you reach the diagonals, and don’t worry if they don’t connect perfectly. I also wanted to make the job easier, so I folded the box on each side once again to draw the inside corners and to have the actual length of the interior and leave a 3 cm margin to fold in.
The next part requires a little bit of attention because it’s easy to mess up. At this point, you should have two triangles for each side of the box, but you only need one then you have to remove the other always on the same side (right or left). Make a perpendicular line with the outer corner of the box or just lay the box down on the side and draw it. Remember to do it only on one side. Cut every part you don’t need.


Step 3: To start coating the sides, use tape or glue to fix one of the triangles. Then apply glue on the entire side and stretch the paper as you let the glue dry. Keep doing the same thing until you cover the entire box. Also, don’t forget to glue the margins and to fold them in.
Step 4: Repeat the same process with the lid of the box.


Step 5: Now is the time to paint. I had to create the shade of pink from scratch that I was happy with and cover the interior of the box. I had to paint a second coat to make the paint opaque and even.


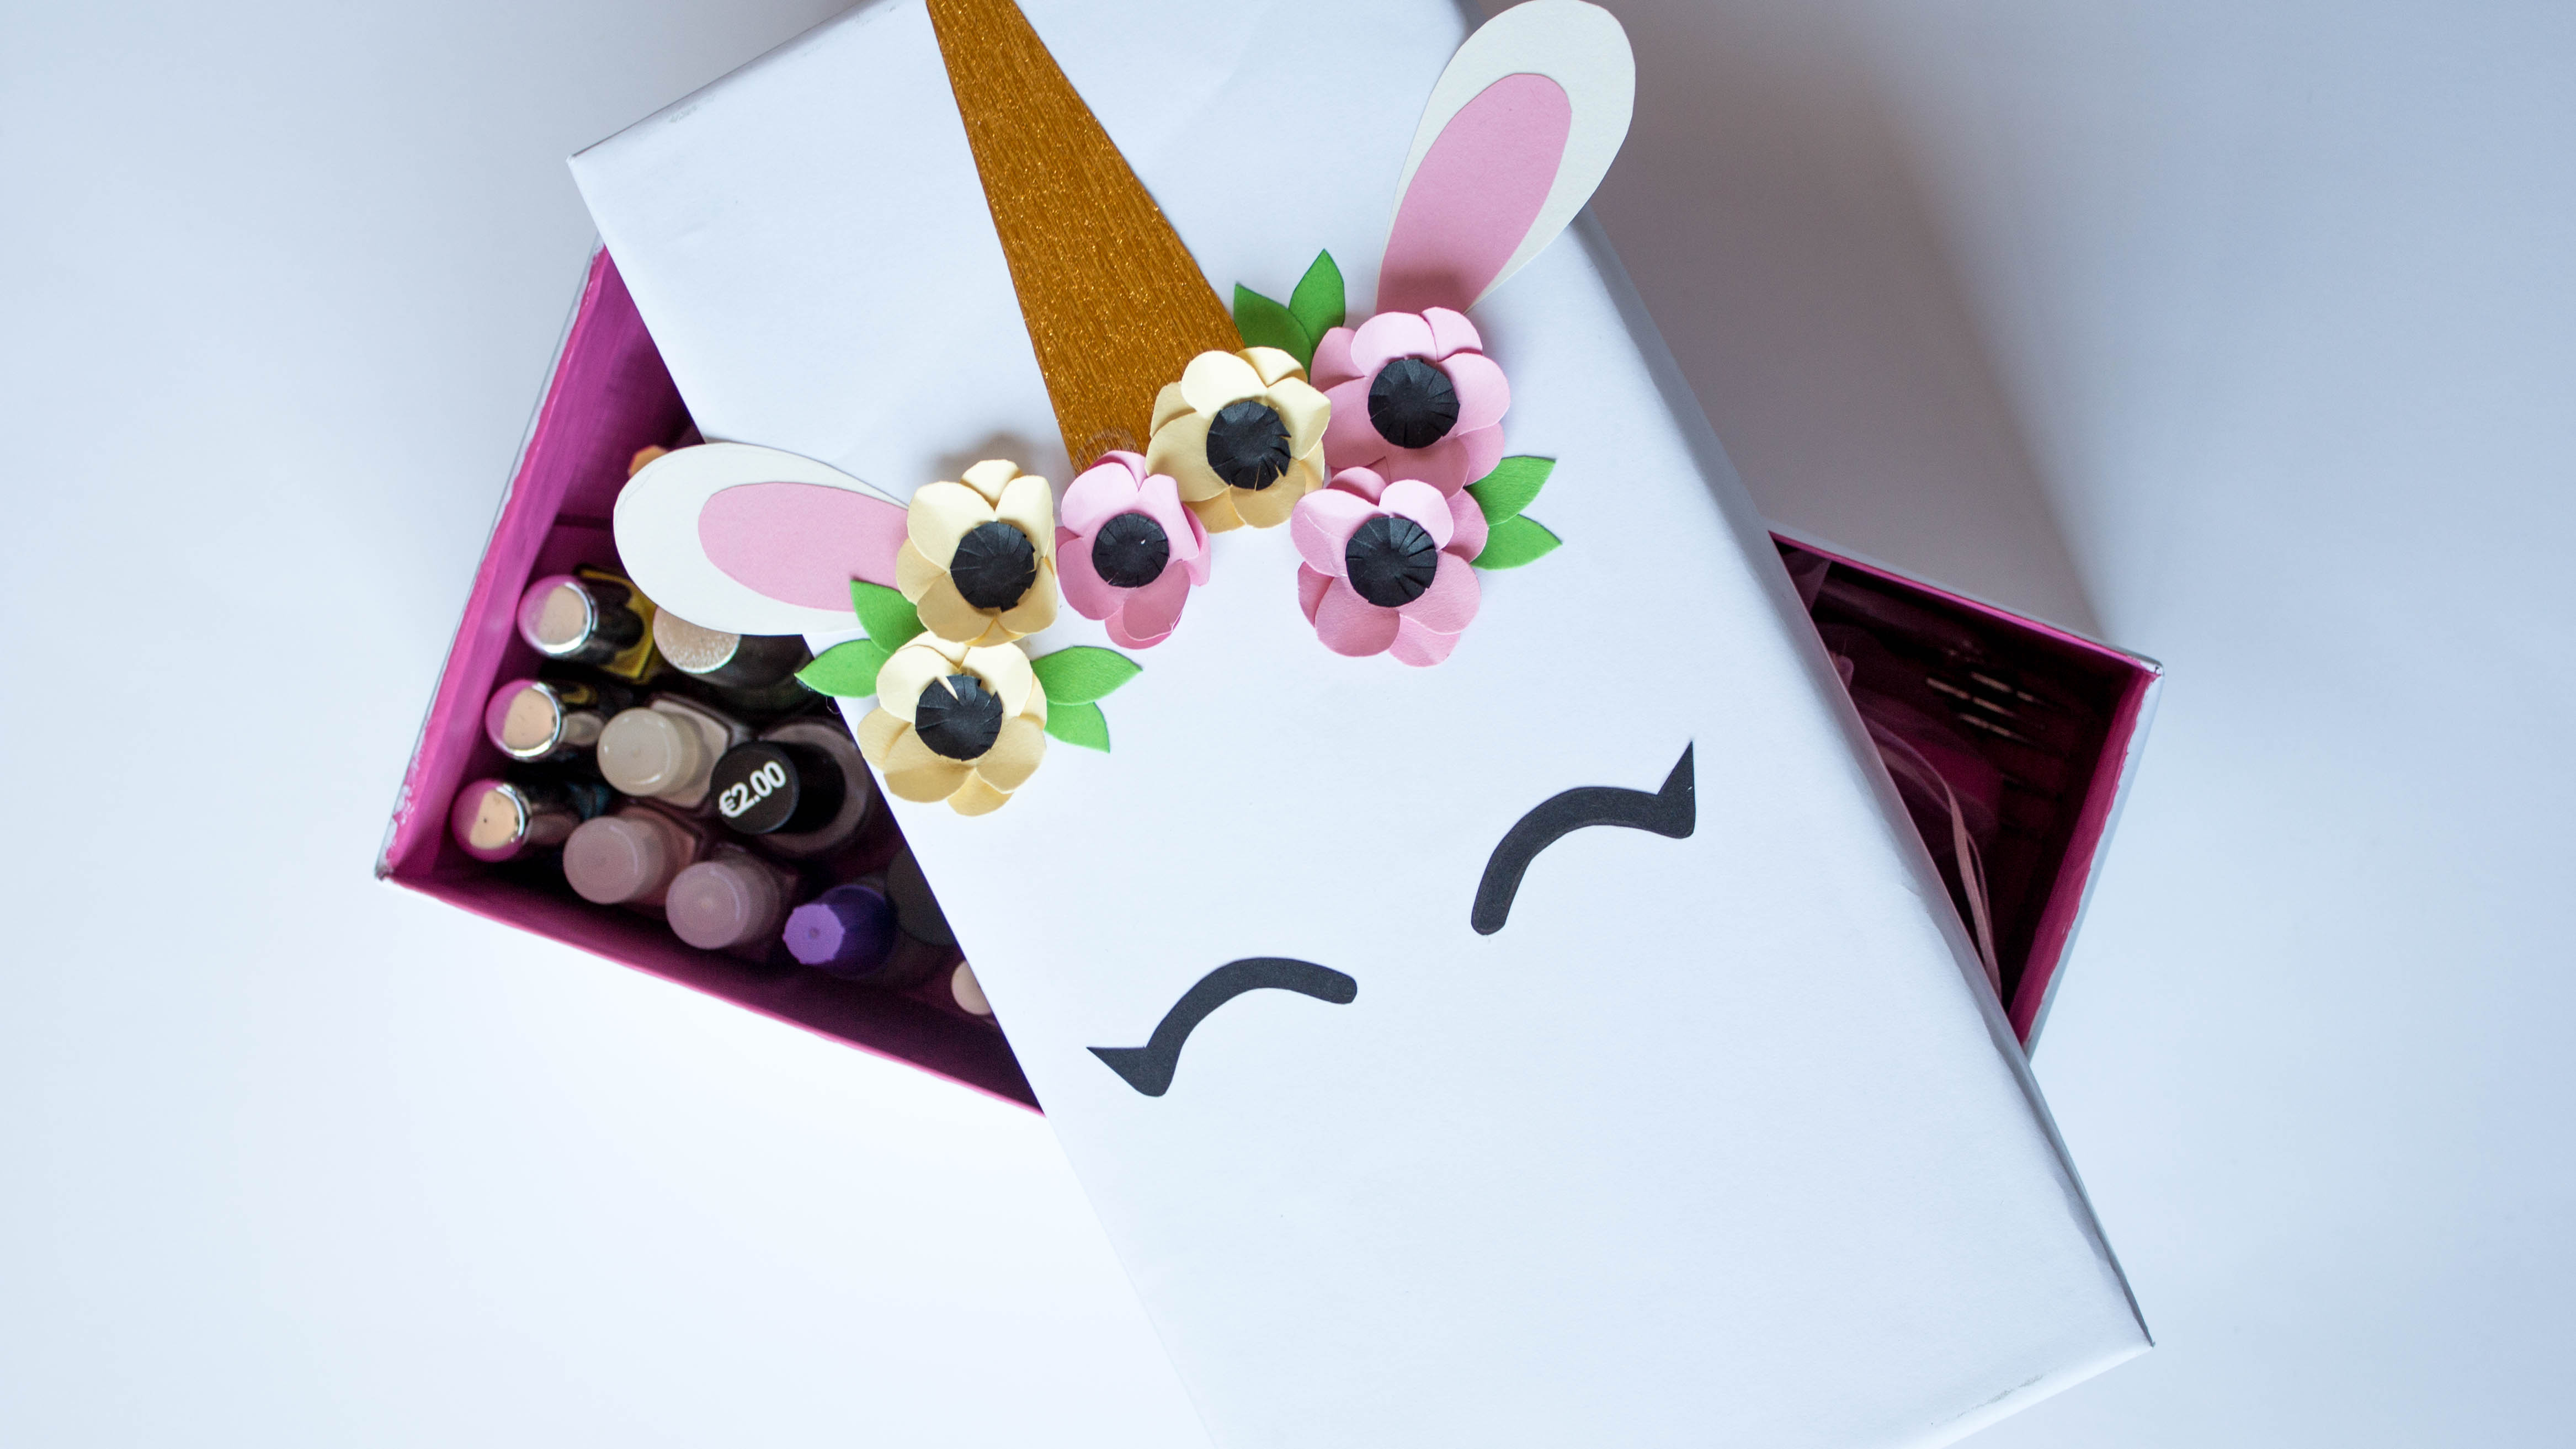
Step 6: It’s time to work on the unicorn’s face. I went on Pinterest to get inspiration and even though, there are thousands of beautiful ideas, I didn’t want to spend to much time decorating the box.
I started by drawing a basic water drop petal and tried to connected them until I got to a base shape I was pleased with for the flowers. I also had to keep in mind the size of the box so the flowers wouldn’t be too big. For the eye of the flower, I just cut out a little circle, and the leaves are two-pointed ovals, very basic stuff.
For the ears, I cut out four long water drop shapes, two of them smaller and in pink to make the inside of the ear. The horn is just a triangle with a curved point in a metallic gold paper. While the eyes are two curved lines with a little triangle in the corners to make the eyelashes. So cute!


Step 7: To save time while making the flowers, I cut out squares of coloured paper slightly larger than the pattern and cut them out all at once. Then for each flower, I pinched and rolled the petals of two flower pieces and glue them together. For the eye, I did little cuts along the circle to the centre and fold them in.


Step 8: Once every piece is cut out and the flowers assembled, it’s time to layout where every piece is going to go and start to glue them to the lid. Begin with the horn and the hears since they are part of the background. Then move into the flowers and the leaves. Lastly, glue the eyes in position, and you are done!


Now is time to put everything back in the box and store it away for the next time I want to paint my nails. As simple as that one ugly box become a beautiful unicorn. At some point, I even thought of paint a rainbow on the outside of the bottom part of the box, but I got scared of ending with a rainbow that I don’t like. So I decided to play it safe and leave it in white. Maybe one day I get bored of all the white and decide to risk it and actually paint that rainbow, and if I do so, probably you will end up seeing it here in the blog.